
Let’s set the scene. You just got a new puppy. Or maybe you finally finished building that dream home office setup. The lighting is perfect, you snap a quick photo with your phone, and you drop it into a group chat, Reddit, or Twitter. It’s just a photo of a dog or a desk. What could possibly go wrong?
Between you and me, a modern smartphone camera captures a terrifying amount of information. It’s not just the crisp visual detail that lets strangers zoom in on the shipping label of that Amazon box in the background. It’s also the invisible digital fingerprint attached to the file—sometimes the exact GPS coordinates of where you were standing, the time you took it, and the device you used.
Personally Identifiable Information (PII) isn’t just your Social Security number or bank password. Under frameworks like GDPR, “personal data” is any information relating to an identified or identifiable person—which is broader than many people assume. (GDPR, Art. 4)
This isn’t about paranoia. It’s basic digital hygiene. We lock our doors, but we casually hand out maps to our living rooms every time we upload raw photos.
Quick note: This is general guidance, not legal advice. If you’re handling sensitive cases (health records, legal evidence, child safety), treat this as a baseline and follow your org’s policies too.
TL;DR (the safe sharing workflow in 20 seconds)
If you want a fast routine that covers most real-world risks:
- Scan the frame for addresses, plates, screens, QR codes, reflections.
- Crop away anything sensitive: Crop Image
- Resize to the smallest useful size (reduces readable micro-detail): Resize Image
- Strip metadata (EXIF/GPS/device/time): Remove Image Metadata
- Compress for easier sharing (and smaller leaks): Compress Image
If it’s an iPhone HEIC file and you’re sending it to someone who might struggle to open it:
- Convert first: HEIC to JPG
What counts as PII in a photo (a practical definition)
In photo terms, PII is anything that can trace:
- your identity (face, name badge, unique tattoo)
- your location (street signs, house numbers, GPS metadata)
- your routines (school logos, workplace entry cards, gym name)
- your network (other people’s faces, kids in uniforms, visitors in the background)
If you want a simple rule: if someone could use the photo to find you, contact you, impersonate you, or target you, treat it as PII.
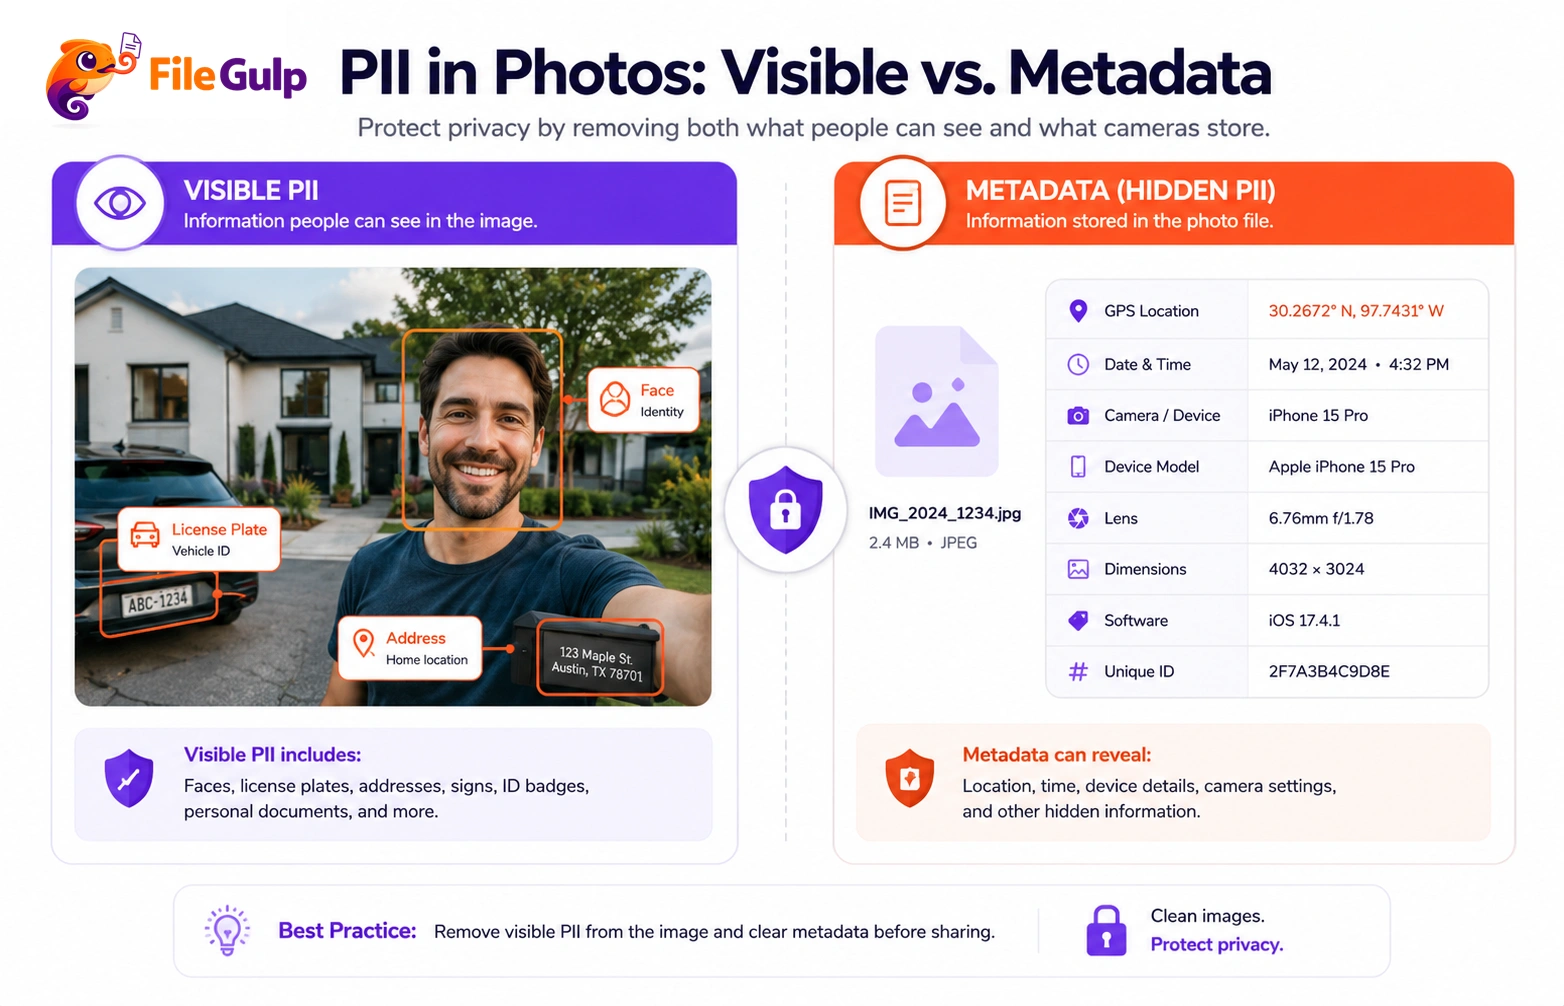
The two types of photo PII (the postcard analogy)
Think of a digital photo like a postcard:
- The front is the actual picture: visible PII.
- The back is the routing info, postmark, return address: invisible PII (metadata / EXIF).
You need to handle both if you want to share safely.
Part 1: The invisible threat (EXIF data and metadata)
Let’s talk about the back of the postcard first, because it’s the one that catches the most people off guard.
When you take a photo, your phone often writes EXIF metadata into the file. EXIF was standardized by the camera industry body CIPA. (CIPA EXIF)
It started as “photography nerd notes” (shutter speed, ISO), but phones turned it into something that can be… a little too revealing.
What EXIF metadata can include (common fields)
Depending on your device and settings, EXIF can store:
- GPS coordinates (latitude/longitude)
- Altitude (yes, sometimes enough to hint at floors/buildings)
- Timestamp (down to the second)
- Device model (e.g., iPhone model)
- Software tags (editing app names, versions)
- Camera settings (ISO, shutter speed, focal length)
Not all of these are equally sensitive. GPS is the big one. Timestamp + location can also be a pattern leak.
The real-world consequences of metadata leaks (the McAfee story)
If you think nobody looks at this stuff, history disagrees.
In 2012, John McAfee was on the run in Belize. A journalist took a photo with him, and the outlet published it without stripping EXIF. The image contained GPS coordinates that revealed his location. He was found shortly after. (wired.com)
You probably aren’t an international fugitive. Still, you probably don’t want the person you’re selling a couch to on a marketplace to know the exact coordinates of where you took the photo.
Where metadata leaks usually happen
People ask: “Doesn’t Instagram remove metadata?”
Many big platforms do strip EXIF on upload (privacy is part of it; storage/processing is a big part too). The problem is relying on that behavior everywhere.
Metadata tends to leak when you share the original file:
- Email attachments (often preserve EXIF)
- iMessage / SMS (depends on settings and how you share)
- Discord / Slack (can be inconsistent, especially for raw files)
- Cloud storage links (Drive/Dropbox preserve the original file)
- Forums / support tickets / job portals (varies widely)
If the file leaves your camera roll intact, assume metadata travels with it.
How to strip invisible PII (the safe habit)
You could turn off location tagging permanently, but honestly, many people want location in their private albums. The better habit is to scrub photos right before sharing.
File Gulp tools run in your browser (client-side), so your photo doesn’t have to upload to a server just to remove EXIF. It’s fast, private, and it turns “I hope this is safe” into “I know it is.”
Part 2: The visible threat (what’s hiding in the background)
Now the front of the postcard: the pixels.
Today’s phone photos are sharp enough that people can zoom into details you didn’t even notice were captured. When you post high-resolution images publicly, you’re basically inviting “zoom and enhance.”
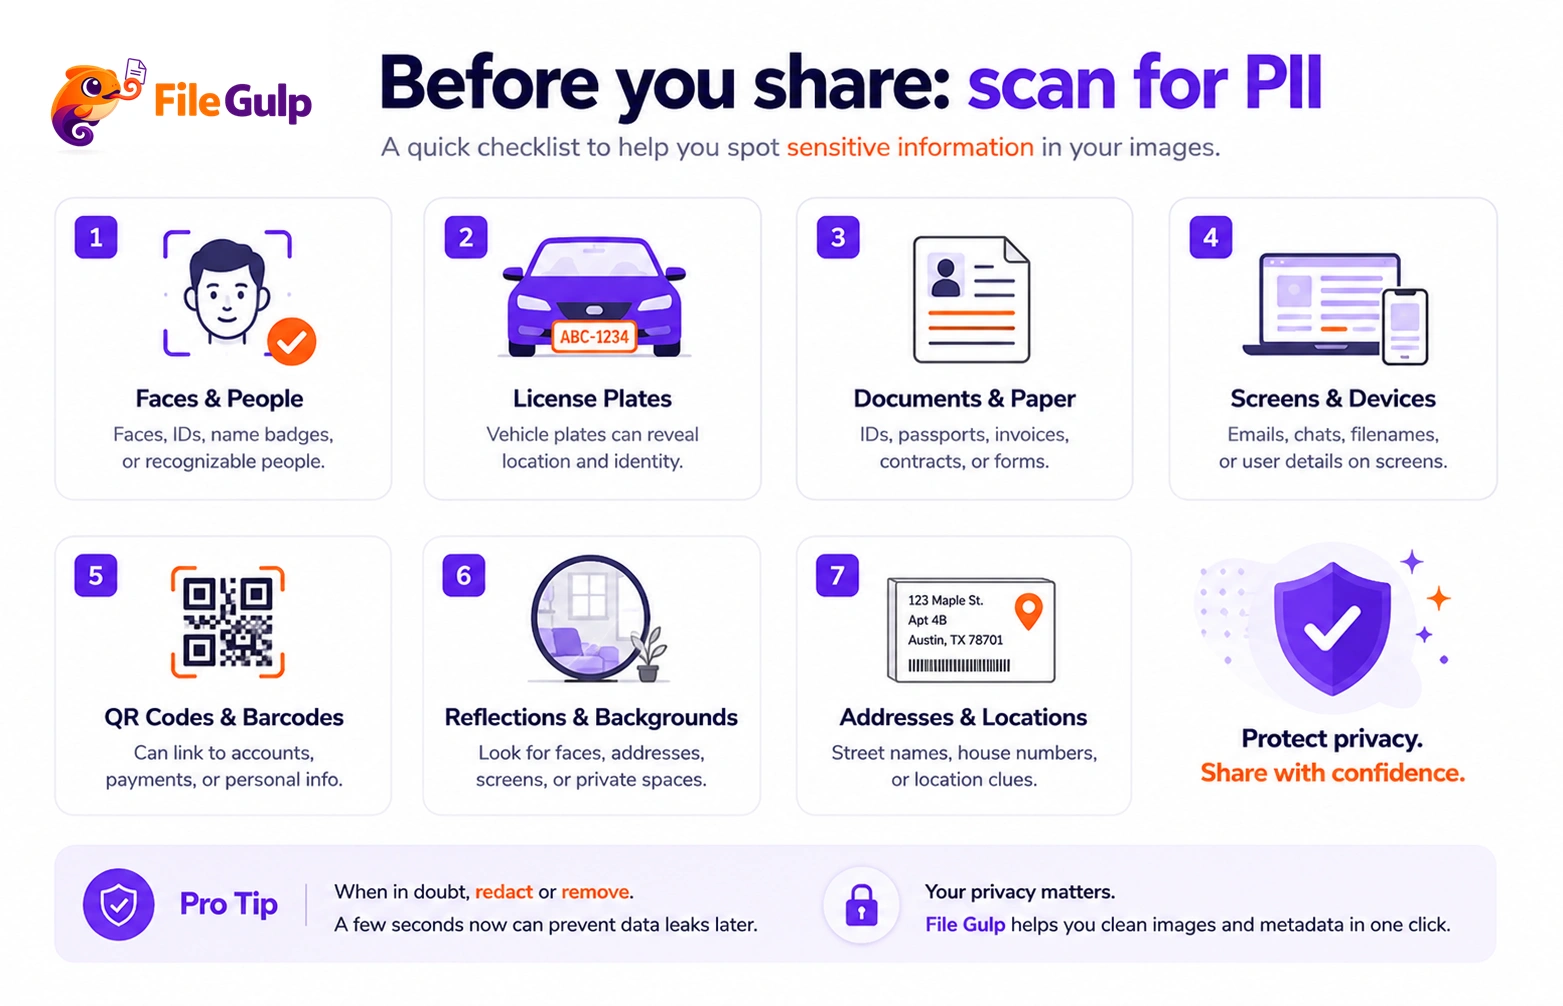
A practical checklist: what to scan for
Your brain focuses on the subject and ignores the clutter. You have to intentionally scan the edges of the frame.
Do it in two quick passes:
Pass 1: Zoom out (context clues)
- Street signs, storefronts, building names
- Recognizable landmarks near your home
- Car details (plate, parking permit, unique stickers)
- School logos, sports club names
- Faces of bystanders (especially kids)
Pass 2: Zoom in (small text)
- Shipping labels on packages
- Paperwork on a desk
- Laptop/phone screens (emails, Slack, calendar invites)
- QR codes and barcodes (tickets, boarding passes)
- Reflections in windows, mirrors, glossy frames
- Work badges and lanyards
The “I’ll just scribble over it” mistake (and why it fails)
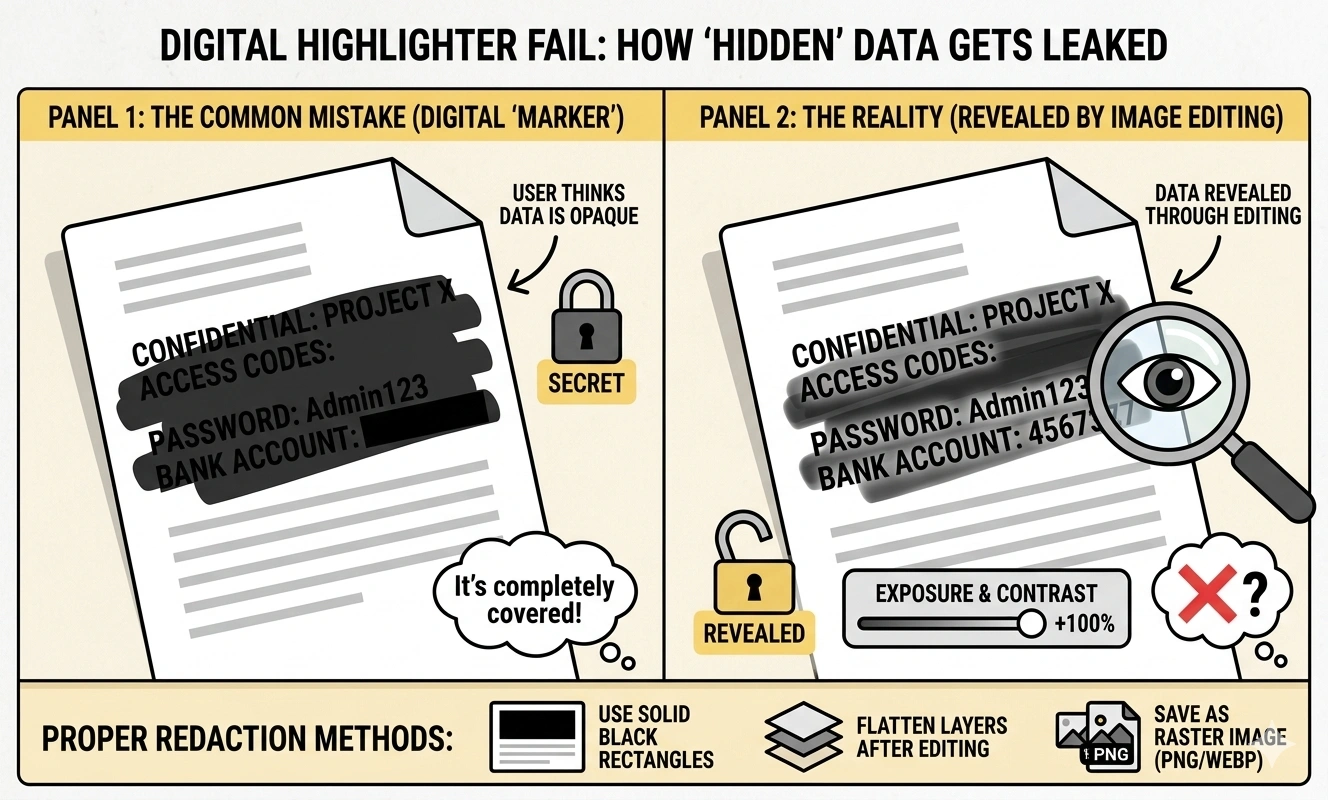
When people notice visible PII, they often grab the default iOS/Android editor and scribble with a marker/highlighter tool.
Here’s why that can be dangerous: those pens often have opacity, blending, or compression artifacts that make them look solid while still leaving underlying text mathematically recoverable with contrast/exposure tweaks.
How to actually hide visible PII (secure options)
You’ve got three solid strategies. Which one you choose depends on the image and what you’re hiding.
1) Crop it out entirely (cleanest, hardest to reverse)
If the sensitive info is near the edge, cropping is your best friend. Cropping removes the pixels completely.
Use: Crop Image
After cropping, you’ll often want to resize/compress for sharing:
2) Redact with a solid, opaque block (best for documents and text)
If the PII is in the middle (address line, ID number, patient info), use a true opaque block.
A simple workaround inside File Gulp:
- Use Watermark Image with a solid black square PNG placed over the sensitive area.
If you ever use an editor with layers, make sure you export a flattened final image. Otherwise, someone can sometimes recover hidden text by toggling layers or extracting the original content.
3) Resize + compress to reduce legibility (helpful, but not a redaction tool)
If you only need the image as a small avatar or a quick “look at my new desk” post, shrinking the image can destroy fine background detail.
A practical approach:
- Resize to 800–1600px wide: Resize Image
- Compress: Compress Image
Be honest with yourself here: this helps, but it’s not a guarantee. If the text is still readable, treat it as leaked.
Don’t forget QR codes (treat them like passwords)
QR codes can contain:
- ticket data
- boarding pass IDs
- payment links
- login URLs
If a QR code is visible, assume someone can scan it. Crop it or redact it completely.
Context-based guidance (because not every photo needs the same strictness)
If you’re selling something online (marketplace listings)
Common leaks: address labels on boxes, reflections showing your home, serial numbers, license plates.
Best approach:
Crop hard (Crop Image) → Strip metadata (Remove Image Metadata)
If you’re posting photos of kids
Be extra conservative: school logos, street signs near home/school, name tags, other children’s faces.
Best approach:
Crop + solid redaction for faces not meant to be public → Remove metadata every time (Remove Image Metadata)
If you’re sharing documents (medical, legal, banking)
Treat as high sensitivity. Don’t rely on blur. Use solid redaction blocks and flatten the final image.
If you’re a photographer delivering client galleries
Strip metadata unless the client explicitly needs it: Remove Image Metadata
Also watch behind-the-scenes shots (whiteboards, laptop screens, call sheets).
Comparison table: PII types and the best removal method
| PII type | Example | Best removal method | Why |
|---|---|---|---|
| Address on package | Shipping label | Crop or solid redact | Text is high-risk; blur can stay readable |
| License plate | Car photo | Crop or strong blur/pixelate | Protects identity/location patterns |
| Face of bystander | Street photo | Crop or strong blur | Consent + identification risk |
| QR code / barcode | Tickets, boarding pass | Crop or solid redact | Often directly scannable |
| Screen in background | Email/calendar visible | Crop or solid redact | Screens leak more than you expect |
| GPS metadata | Phone photo EXIF | Remove metadata | Invisible leak; easy fix |
| Timestamp + device | EXIF tags | Remove metadata | Reduces tracking/profiling signals |
A reliable workflow for safe photo sharing (File Gulp routine)
Digital hygiene isn’t about stopping everything you do. It’s about a frictionless routine you can repeat.
Step 1: The visual audit
Look at the photo. Don’t look at the subject—look at edges, reflections, and background text.
Step 2: Crop away what you can
- Tool: Crop Image
Step 3: Resize to the smallest useful size
A smaller image reveals less detail and reduces “zoom-enhance” risk.
- Tool: Resize Image
- Practical target for general sharing: 1200–1600px wide (often enough)
Step 4: Strip the invisible data (non-negotiable)
Erase GPS coordinates, timestamps, device tags.
- Tool: Remove Image Metadata
Step 5: Convert and compress (speed + compatibility)
- iPhone HEIC compatibility: HEIC to JPG
- Web publishing: Image to WebP
- Reduce file size: Compress Image
“But I already posted it”—what to do after a mistake
It happens. Reduce exposure quickly:
- Delete the post (or replace the image) ASAP.
- Re-upload a cleaned version (cropped/redacted + metadata removed).
- If it spread (reposts, quotes, caches), assume the original may still exist.
- Rotate/replace compromised items if needed (ticket QR codes, badge IDs, etc.).
Quick “Before You Share” checklist (copy/paste level)
- Did I check for addresses, documents, screens, QR codes, faces?
- Did I crop away what I can? (Crop Image)
- Did I resize to the smallest useful size? (Resize Image)
- Did I remove metadata? (Remove Image Metadata)
- If it’s for the web, did I convert to WebP and compress? (Image to WebP + Compress Image)
- If it’s an iPhone photo, did I convert HEIC if needed? (HEIC to JPG)
At the end of the day
Privacy isn’t about having something to hide. It’s about controlling what you choose to broadcast.
Every time you post an unedited photo straight from your camera roll, you might be sharing a bunch of data nobody asked for and nobody needs. Crop out the background clutter. Strip metadata with Remove Image Metadata. Share the puppy, the desk, or the sunset—without sharing your front door.